

Shownotes:
Scarlet Skeiners Group on Ravelry
Scary Vogue Sweaters #1, #2, #3
My First Sweater (the one still intact)
* To enter the NeverNotKnitting drawing please leave a comment on this post according to the specifications mentioned in Episode 3. Don't forget to include which magazine you would like to receive if you win the drawing. Thankyou!!!

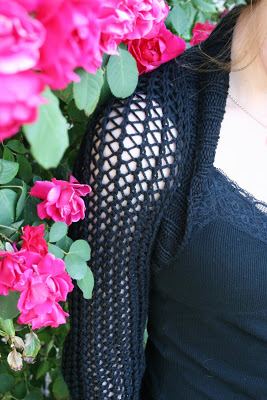
The fastest shrug of all time....
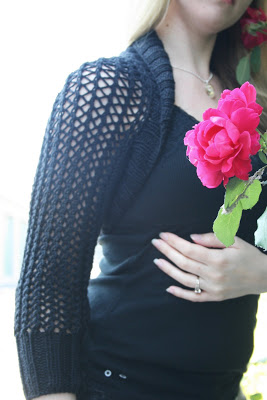
I finished this Retro Redux Shrug over a week ago now, and finally bribed my husband into taking some pictures for me.
I finished this shrug in like 5 days. It was so quick and easy.
So much for the "knit-a-long" idea...
I am really glad that I made this project because I think it will be the perfect accessory to throw over a tank this summer when evening comes or if I'm in some heavy air conditioning.
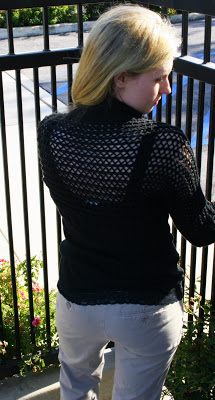
I ended up changing the pattern a tiny bit, I made the sleeves longer. I think sleeves are a bit more flattering elbow length than when they end at the mid upper arm, which is what the pattern calls for.
I used 4 balls of Debbie Bliss Cashmerino Aran and still have most of that fourth ball left over. If I hadn't made the sleeves longer, I could have easily knit this shrug with only 3 balls. That is a pretty inexpensive knitting project!
The pretty lace stitch is just a two row repeat, making it a pretty mindless pattern.
We all need "mindless" once in awhile...
In a previous post, I had promised you complicated, scary sweater projects.
This one may not be complicated, but it is scaring me a bit...
Meet the "Dad Sweater"
I started this sweater for my Dad a few weeks ago now and I like the pattern quite a bit.
The simplistic ribbing with the tweed is a perfect combination in my opinion. It's just a nice, plain, masculine sweater that should be very versatile to my Dad's wardrobe.
My Dad is a salesmen and I think that this sweater will keep him warm when he is on the job and look good over a nice collared shirt paired with the tan slacks he always wears.

Why is this sweater scaring me? The pattern, although a nice design, has some pretty glaring errors that make me apprehensive about how this will turn out. Also, even though it is easy to work on (How mindless is ribbing, right?) It is ALOT of ribbing. This thing is gigantic! I've never knit a man's sweater before. What a huge size difference!
This taupe was actually not my first color choice. I had originally had my eye on the dark chocolate brown that I had used to make my Dad's hat. Guess what? Discontinued.
So I decided to go with this color because it is very neutral, and I'm glad that I did. The color is right in between gray and brown so I think it will work nicely with both colors.
I can't wait to give my Dad his finished sweater. I am excited because I think it will make a very special present.
My Dad is very important to me and I feel like handknitting a sweater for him is just a small thing I can do to show him how much I care about him.
.....plus, I finally forgave him for never wearing the socks I made for him 2 years ago....
It's day 5 and I'm still going strong!
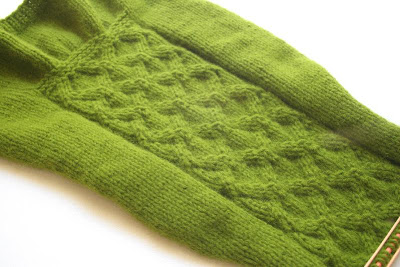
I am making good progress on my Lush and Lacy Cardigan.
The back has been completed!

Oh... I finished one of the pockets too, but didn't bother to photograph it. :)
I decided to go ahead and use up the yarn that I had originally purposed for this sweater. Elsebeth Lavold Angora. Yes, I happen to like this crazy shade of green.
So far, I love making this cardigan. The lace panels keep it interesting, and since the pattern is worked on a US size 9 needle, it is going fast!
I have been seriously neglecting my blog lately and I have several projects to share.
One is finished and two more have been cast on.
This week I plan to post every other day to catch up. ...hopefully...

I signed up for the Ravelympics!
I am competing with Team Central Coast on Ravelry in the "Sweater Sprint" event. The idea behind Ravelympics is that you have to cast on a project in the opening ceremonies of the Summer Olympics and cast off during the closing ceremonies. You are supposed to start a project that would be a challenge for you to complete in 17 days.
I have been planning on starting the Winter Wonderland Coat out of the book Inspired to Knit, but knew that there was no way I could knit that in 17 days. Unless I didn't eat, bathe, or use the restroom.... So I decided to make the Lush and Lacy Cardigan my Ravelympics project.
It is a much more manageable sized sweater.
It will be a challenge, but I will finish it.
I've been wanting to make this sweater for awhile! I'm really excited to start!
Shownotes:
Amelie Sock Pattern on Ravelry
The Scarlet Skeiners group on Ravelry
Me Buying the Angora at Stitches West
Inspired to Knit
Subscribe with
or
(Sorry everyone about the background noise in the first segment. My two year old was playing with a train toy in the other room while I was recording and the microphone picked it up. oops!)
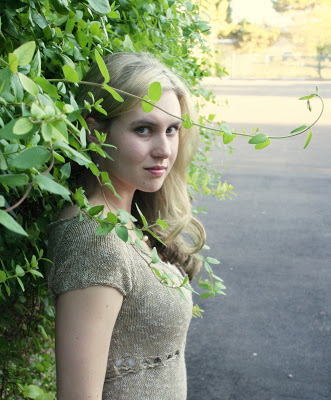
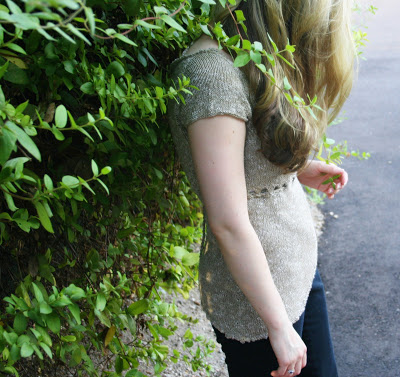
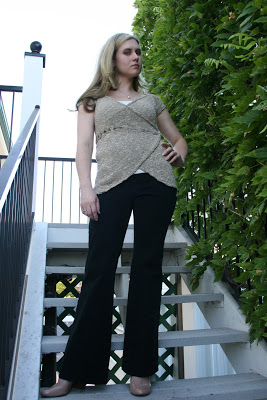
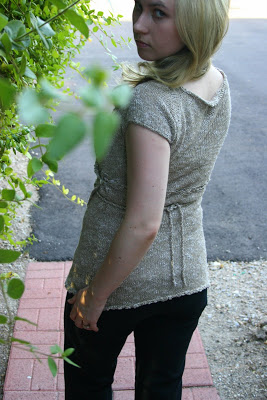
Giselle is finally off the needles....
...thank goodness! This knit has been such a pain!
I thought that the endless stockinette stitch on the body was bad... little did I know what I was in for with the edging. I had to pick up and knit.. get this... 476 stitches around the perimeter of this top! 476 stitches evenly spaced! 476!!!
I had wasted so many hours of my life picking up these stitches, I just had to count them.
After all those darn stitches were on the needle I then had to bind them off using the picot bind off method. Talk about time consuming. Two full evenings. Gone.
But of course, it was worth the work. The picot edging really finishes it off and adds a nice feminine detail.

Even though it wasn't that much fun to work on, I am very happy with the finished product. The top fits very well. Also the yarn has a beautiful drape and sheen making it a perfect top for dressy occasions.
One tiny little issue though, I found it hard to make the top stay where it was supposed to and not gape open at the front as wrap tops can sometimes do. So I added a button to one side and that fixes the problem quite nicely.

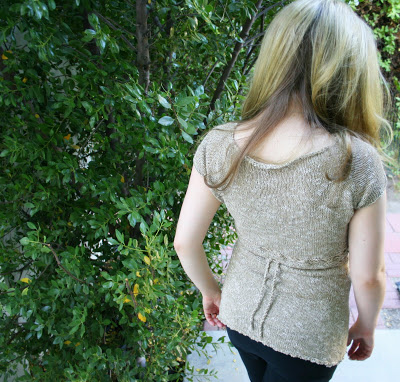
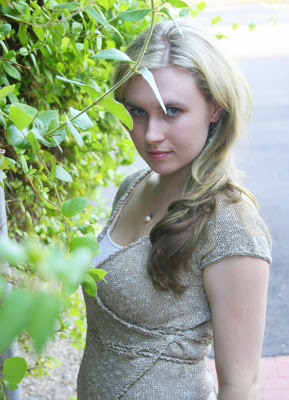
Of course this top has been modified from the original pattern. It was originally designed to include these flared, renaissance looking sleeves that I wasn't sure if I was completely into, so I decided to leave them off. The short sleeve version fits my style much more and will be great in the spring/summer, the time when I will be wearing this the most. Since the yarn (Berocco Seduce) is a linen blend, it is more suited to the warmer months.
All in all, I really like the Giselle pattern...
...But wont be knitting it again any time soon.
Guess who came out of its gallon size ziploc bag?

Giselle!
I started this top back in April! And I am just now working on it again. I lost interest for awhile there but the guilt of knowing it's sitting there unfinished drove me into a Giselle-knitting frenzy. So I pulled it out and started working on it again.
I've decided to forgo the long sleeves and leave it cap sleeved the way it is. It will be a better summer top that way and less knitting for me, yay!
To tell the honest truth, I'm not really enjoying this project but I am looking forward to wearing it.
So I must press on.
Well... back in May I designed what I thought was a beautiful sock. I submitted it to Knitty.com, and well.... I think you can figure out what happens next....
This is the third time this year that I have had a pattern rejected and frankly I'm starting to think that I should just stick to knitting other peoples patterns than trying to come up with my own.
It is such a pretty sock, I was sure that this was "the one" that was going to make it.
Ahhh.. well....
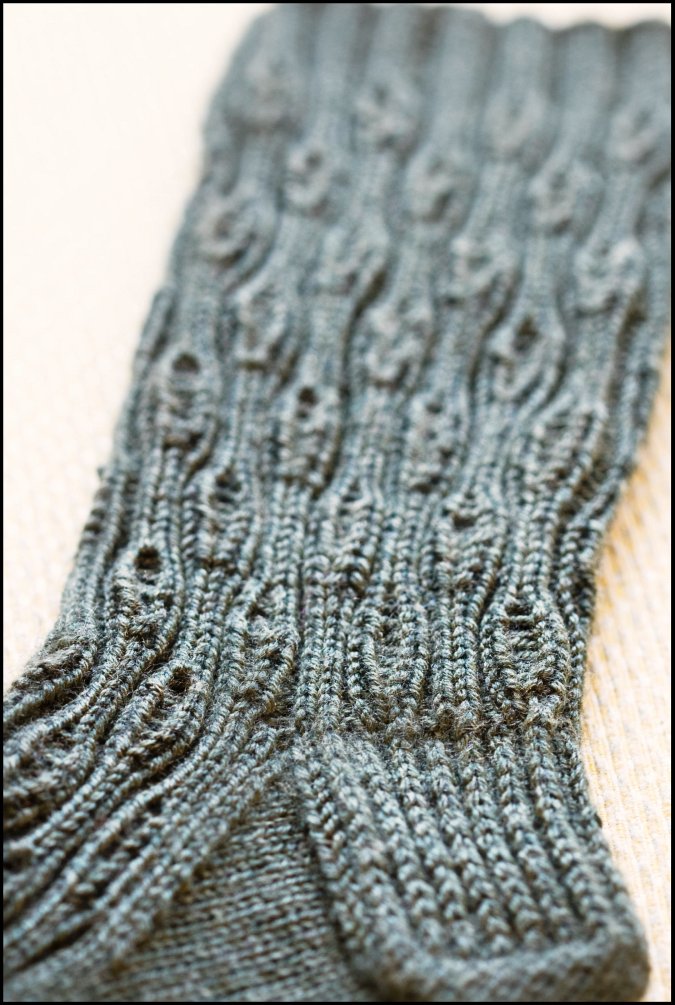
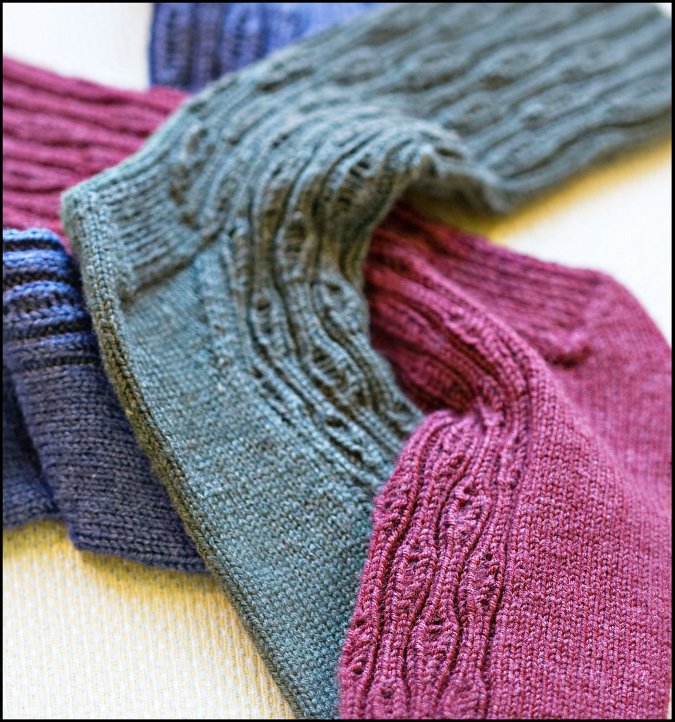
Introducing my new sock pattern... Amelie.
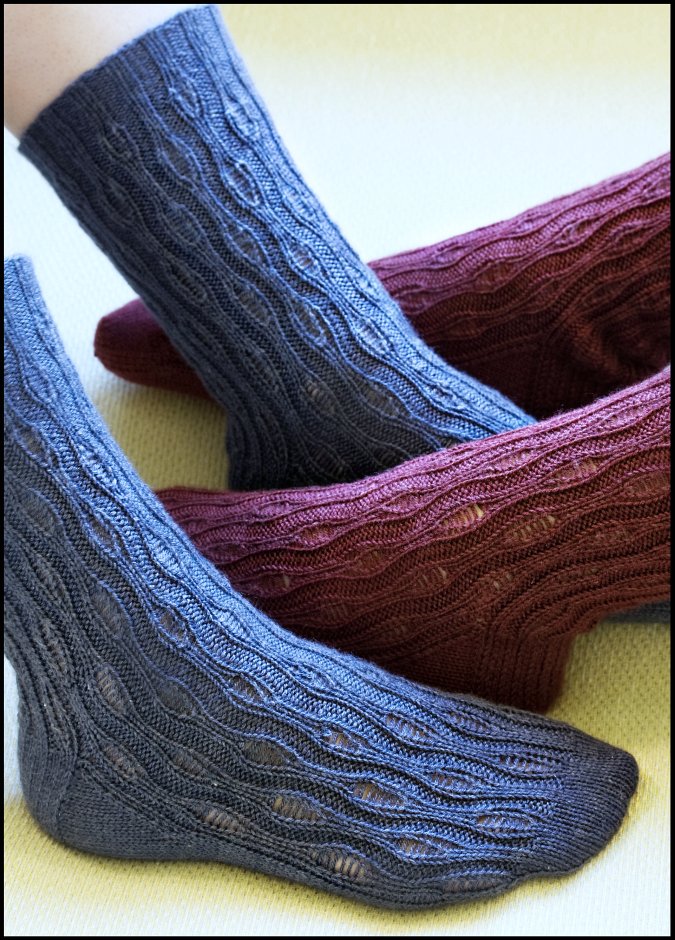
Amelie is a fun, easy to memorize sock pattern that you’ll be sure to enjoy knitting. The ribbed yet lacy stitch creates a nice stretchy fabric that clings nicely to your leg. The lace look is created by simply dropping stitches, which all of us knitters have a little experience with. The pattern is sophisticated and can be dressed up or down depending on which yarn you choose to knit them with.
The awesome thing about this pattern is that it has been written to accommodate three different methods of sock knitting. You can knit up your Amelie socks using double pointed needles, 2 circular needles, or one circular needle (magic loop). This pattern offers a great opportunity to not only try out a new sock knitting technique, but also to understand more how to convert patterns from one technique to the other. Each technique is color coded so it's easy to keep track while you are knitting up this pattern.
Thankyou again to Audrey for taking the beautiful photos for me.

Here is the pattern information for those of you interested in knitting up this pattern:
FINISHED MEASUREMENTS
Cuff Circumference: 11 inches stretched.
Foot Circumference: 7 inches unstretched
Leg Length: 6 inches (shorter version) 8 inches (longer version)
Foot Length: adjust to fit
MATERIALS
Version A (Burgundy Version): Regia Silk [55% Merino wool, 20% Silk, 25% Polyamide; 219yd/200m per 50g skein]; color: #032, 2 skeinsVersion B (Blue Version); color: #053, 2 skeins
Version C (Green Version); color: #070, 2 skeins
DPN Method: #1 set of 5 US #1/2.25mm double pointed needles
2 Circulars Method: #2 24-inch US #1/2.25mm circular needles
Magic Loop method: #1 32-inch US #1/2.25mm circular needle
Regular closed ring stitch markers (2 circular or magic loop method only)
Safety pin or split ring stitch marker
Tapestry Needle
GAUGE
34 sts/52 rows = 4" in Stockinette stitch
I hope you enjoy knitting up your very own pair of Amelie socks!
(This pattern has been updated into a beautiful new pattern layout and format August 2010.)


Shownotes:
Knitting Vintage Socks by Nancy Bush
If you liked Episode one, please be sure to leave a comment!
Thank you!
Done!!!

These have been off the needles for a day or two now. I really raced through that second sock because I have a few other sock patterns that I desperately want to start.
I'm on a "knee-high sock kick" right now.


This pattern is the most complicated sock that I have knit to date. It isn't HARD, just one of the patterns where you have to pay attention every row. On the second sock, though I had chart A pretty much memorized and only had to look down occasionally to make sure that I was still on track.

My sister-in-law is making these same socks and when she finished her first, we both noticed how funny lookin the toe was. The pattern is written to include this ugly, pointy, squared off toe that really takes away from the beauty of the sock. I worked a standard rounded toe on my pair, and I think that it looks alot better.
This is what I did:
TOE:
Work decreases at stated in pattern until you have 64 stitches total.
Round 1: k all sts.
Round 2: Needle 1- k1, ssk, k to last 3 sts , k2tog, k1
Needle 2- k1, ssk, k to end
Needle 3- k to last 3 sts, k2tog, k1
(4 sts decreased)
Repeat these last 2 rounds until 32 sts remain. Then work just Round 2 until 12 sts remain. Slip sts from needle 2 onto needle 3, and graft the stitches together using kitchener stitch.

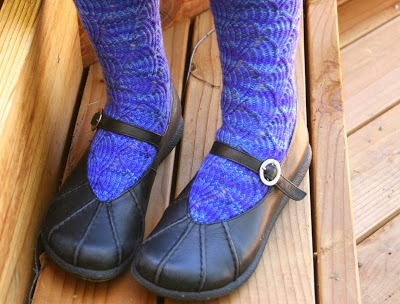
I really am obsessed with how cute handknit socks look with a good pair of Mary Janes. I want to extend my sock wardrobe to have a different color sock for every outfit.
One down! One to go!
This sock pattern is apparently not for the faint of heart because several knitters in the Pomatomus Sock knit-a-long have dropped out!
It is a time consuming pattern, but oh so worth it!
That being said, I still took precautions and cast on for sock #2 right away
to prevent a serious case of
"second sock syndrome" from setting in.

sooooo pretty...
To my dearest blog readers,
(All 3 of you out there...)
(All 3 of you out there...)
I know... I know... you are probably so sick of seeing pictures of dollies.. But please bear with me. These were just too cute. I had to share.
For all of you who feel that if you see one more dolly picture you might just throw up.....well... now is the time to go get yourself a bucket.
These pictures are from when Ava gave her cousin Audrey her dolly as a special present.


Ok, thats it... I promise I'm done.
So now that I've gotten all of that "doll knitting" out of my system, there are some exciting things coming up here!
I have some projects that are soon crossing the finish line,
as well as some super huge, complicated, scary sweaters
that I will be starting very soon.
Stay Tuned.

ITS A GIRL!!!
It is our pleasure to announce that on July 2, 2008 at 11:13 pm a beautiful healthy baby was born to Ava's Dolly.
Weighing .3 oz, and measuring 5 inches


After a few days in the hospital, Ava's Doll is so happy to be home enjoying her new baby...
I decided to make a baby for the doll because my daughter is obsessed with playing "babies" right now. She is always walking around rocking her dolls and giving them bottles. She has been have a blast pretending with this little baby too.
To make the baby:

(I made up this pattern based on the adult size doll pattern out of the book "Knitted Babes")
Use size 2 needles and a small amount of dk weight yarn. (The book calls for a fingering weight but I found the perfect flesh color in a dk and also it knits up to a tighter firmer fabric so that no stuffing shows through.)
BODY:
(Make 2)
Cast on 12 sts, purl first row. Work 19 rows total in stockinette stitch.
ssk, k to last 2 sts, k2 tog (10 sts)
p2tog, p to last 2 sts, p2tog (8 sts)
mark first and last sts for underarm placement with safety pins.
ssk, k to last 2 sts, k2 tog (6 sts)
purl 1 row
kfb, k to last st, kfb (8 sts)
purl 1 row
repeat last 2 rows until there are 16 sts.
work 5 rows in stockinette stitch
k2tog across row (8 sts)
purl 1 row
k2tog across row (4 sts)
bind off purlwise, leave a long tail for sewing up the doll.
Arms:
(Make 2)
Cast on 3 sts, work a 3 st I-cord for 13 rows, bind off.
Legs:
(Make 2)
Cast on 4 sts, work a 4 st I-cord for 15 rows, bind off.
I embroidered her face as directed in the Knitted Babes book using tiny pieces of felt. I cut the felt eyes and lips to a smaller scale to fit the baby's face.
I made the bellybutton with a french knot using the same flesh toned yarn.
I seamed the doll with a darning needle and yarn tails, carefully placing arms and legs as I went.
Dont forget to stuff your doll at the same time!!! The book recommends doll stuffing, but I used small bits of wool roving. I think that it gives it a more natural feel.
(Oh yea...Dont completely sew up the head before you stuff it, that neck is so tiny, its impossible to stuff the head through that small opening!)
I added hair as directed in the book using a crochet hook. I did it the same way you would add fringe to a scarf then clipped the hair to a desired length.
Weave in your ends!
To make the diaper:

Use fingering weight yarn and size 2 needles.
cast on 15 sts
purl first row
knit 1 row
purl 1 row
decrease row- ssk, knit to last 2 sts, k2tog (13 sts)
repeat last 2 rows once more
work only decrease row one more time (9 sts)
p2tog, p to last st, p2tog (7 sts)
knit 1 row
purl 1 row
knit 1 row
pfb, p to last st, pfb (9 sts)
increase row-kfb k to last st, kfb (11 sts)
purl 1 row
repeat last 2 rows once more (13 sts)
(to make the diaper tabs)
work increase row again and cast on 3 sts at end of row using backwards loop cast on (18 sts)
purl across row, casting on 3 sts at end of row using backwards loop cast on. (21 sts)
knit 1 row
purl 1 row
bind off knitwise.
Try the diaper on the baby, fold tabs from the back of the diaper to overlap the diaper front. Adjust to fit your baby, pin into place. Remove diaper from the doll and stitch down diaper tabs to diaper front.
Weave in ends.
To make the blanket:

Use size 3 needles and fingering weight yarn.
Cast on 45 sts
(basketweave pattern)
1- k3, p3, repeat across row
2- p3, k3, repeat across row
3- k3, p3, repeat across row
4- k3, p3, repeat across row
5- p3, k3 repeat across row
6- k3, p3, repeat across row
repeat the last 6 rows, 8 times more
cast off sts in set ribbed pattern
With a contrasting color, sc around blanket, working one sc for every stitch on the blanket bottom and top, and 2 sc for every 3 rows on the blanket sides. Work 2 sc in each corner.
Work one more complete round of sc around blanket.
Shell border: *ch1, sk 1 sc, (2 dc, ch1, 2 dc) in next sc. ch 1, sk 1 sc, sc in next sc
repeat from * around entire blanket.
Weave in ends.

The doll will now be so happy to have a fresh diaper and a warm cozy blanket.

Dolly is getting used to being a mommy and is getting a lot of practice changing diapers...
She is also sleeping when the baby sleeps....

Ava's dolly is expecting a baby!

Don't ask me how it happened....
It has all happened so fast but she is already in her third trimester and is due to give birth any day!
Ava is very very excited about this...
These dollies have been done for a few days now, and I just couldn't wait until next week to post pictures!


I am apologizing now for the ridiculous amount of pictures in this post. All the pictures were just too cute and it was hard to pick just a few.
Yea.... this is pretty much the longest post ever, so I hope you have a snack or something.


As you can see, Ava is so happy about them! I know that she is a bit young to fully appreciate her doll, but I cant wait until she and her cousin are a bit older and can pretend, and dress them up by themselves.

I will most likely be supervising Ava when she is playing with her dolly for now, because Im afraid that if I didn't her poor dolly could get very very dirty, seriously injured or have its face smooshed beyond recognition.

Ouch!!!
Ava had a tea party for the dolls today


Blonde Dolly: "My cup is empty! Why does this little girl keep saying that there is tea in here?"
Brunette Dolly: "Shhh... She's crazy! Just go along with it, or she'll pinch our faces together again!"

I made the blonde doll in Ava's likeness with the blonde hair and blue eyes. The brunette doll is for her one year old cousin Audrey who has dark eyes and brown hair.
I embroidered the girl's names on each of the dollies backsides.
(The dolls are so mortified that I am showing you this...)

The pattern for the dolls can be found in the book "Knitted Babes" by Claire Garland. I really love these dolls because you can be creative and give them any look that you would like. I think that their cute little felt faces and long spindly arms and legs give them alot of character.


The only modification that I made to the pattern is that I made their arms and legs I-cords instead of just a stockinette strip. I just think it looks more appropriate. As for the dresses, lace undies, sandals, those patterns are all found in the book.
I used RYC cashsoft for the dolly bodies, and a mix of Rowan Cotton 4-ply and Katia Mississippi for the dresses and shoes.
Audrey's Doll has hair made out of Debbie Bliss Cotton Cashmere.


It was so awesome to be able to use up yarn scraps for this project. These dolls are so neat because you feel as though you are making something adorable out of nothing.... Out of scraps and odd balls of yarn that you would never use anyways. This makes me think of all mountains of yarn scraps that I have. I would love to make future outfits for Ava's doll and put those scraps to good use.


I am hereby setting a new knitting goal for myself. Dolly already has a summer outfit, but every season from now on... or until I dont feel like doing it anymore...I will knit her a new outfit. That way I can slowly build up her wardrobe. By the time Ava is 4 or 5, her doll will have many many outfits to dress up in, for any type of weather.

I hope the Ava will appreciate all the work I put into this, and that her special dolly will be a treasured plaything for years to come.
I am so excited to share with you the Never Not Knitting song!
This has been a fun project over the last couple of months and it's finally done!
Performed by the very talented Hunter
Lyrics by Alana Dakos
Thankyou also to my brother, Morgan, for his creative input!
Enjoy!!!
The dolls are almost finished!

Here are some little lacy dolly underwear that I just finished knitting. They were knit with Katia Mississippi 4-ply yarn. They went super fast. Knitting doll clothing is such instant gratification.
The waist bands of the underwear have elastic so that they will stay on the dolls. These dolls have such puny little bodies, so it was necessary.

I am almost done with everything doll related. I will be posting pictures of their dresses within the next few days and pictures of the finished dolls themselves early next week. I am waiting for my sister-in-law and niece to come back into town to photograph the girls playing with their new dollies together.
That will be so cute...